With many kids on school vacation this week, parents are looking for ways to keep them entertained. So why not infuse a bit of earth-friendly activities with their imagination? Teach kids how to make one-of-a-kind art pieces by recycling items found around the house or items that are typically thrown away.
When the weather is too cold to go outside this week, try a few of our favorites that are not only easy but are made from one of the most common household items – plastic bottles. Have fun!
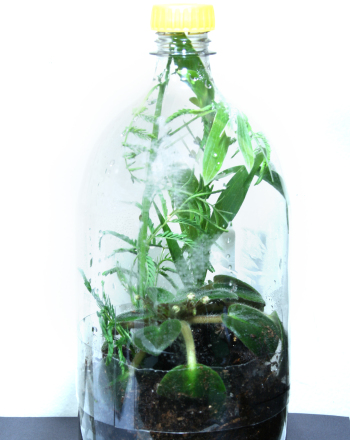
Soda Bottle Greenhouse
It’s the perfect time of year to start seeds and with this soda bottle greenhouse kids will learn to foster seedlings into plants.
What you’ll need:
- 1 empty 2-liter soda bottle, washed and dried
- Craft knife or sharp scissors
- Potting soil
- Seeds (try herbs, flowers or experiment with the seeds from a piece of fruit)
- A plate to hold the greenhouse and keep your tabletop dry
What to do:
- Parents: using the craft knife or scissors, cut the label from the soda bottle. Carefully cut the bottle in half so that the bottom (container) piece is deep enough o hold soil and plants. Poke a few holes into the bottom of the container for drainage.
- Have your child fill the container with soil and plant seeds. Water lightly.
- Put the top half of the soda bottle back on, tucking inside the edges of the container. If necessary, you can cut small slits into the upper portion to make it fit. Leave the cap on.
- Place on top of a waterproof plate in a sunny spot and water sparingly. The lid retains moisture and heat, so your seeds should sprout quickly. Because the plastic is clear, you’ll be able to see the roots beneath the surface of the soil. If the greenhouse gets too steamy, you can remove the lid every once in a while. When your seedlings get big enough, transplant them to the garden, and plant a new crop!
Homemade Rain Gauge
It’s the season of storms and you can add a little bit of science to them by creating a homemade rain gauge.
What you’ll need:
- 1 empty 2-liter soda bottle, washed and dried
- A sharp knife
- Kitchen scissors
- Gravel
- Duct tape
- Ruler
- Fine-point permanent marker
What to do:
- Using a ruler, have your child measure a line 8 3/4 inches up from the bottom of the bottle. This is where the bottle just starts to curve inward.
- Let them use a permanent marker to mark the line.
- Parents: use the sharp knife to poke a hole along the marked line.
- Now that the bottle has been punctured, use the scissors to cut off the top. Set aside the top.
- About 1 3/4 up from the bottom of the bottle, there is line joining the middle piece of the bottle with the bottom. Have your child use the permanent marker to draw a black circle around this whole line and label it “0.”
- Show your child how to use the ruler to mark lines up the side of the bottle at one centimeter intervals. Make sure each centimeter and half-centimeter is marked on the bottle, up to 10 centimeters.
- Have your child fill the bottle of the bottle with gravel, which should just reach the “0” line.
- Return the lid upside down on the bottle and help your child secure the top with multiple pieces of duct tape.
- Have your child add water to the rain gauge, up to the “0” line.
- Place the rain gauge in an open area, not under s tree or overhang, and wait until the next storm!
- To take it one step further, have your child start a “rain journal” to keep track of how many centimeters of rain the gauge gets each day and remind them to reset the gauge to “0” after each measurement. Just pour out the water until it hits the “0” line again.
Soda Bottle Bird Feeder
Making a soda bottle bird feeder combines not just watching the birds, but feeding them as well during these cold months.
What you’ll need:
- 1 empty 2-liter soda bottle, washed and dried
- A sharp knife
- Kitchen scissors
- Hole punch
- Thick string or twine
- 2 chopsticks
- Ruler
- Fine-point permanent marker
- Bird seed
What to do:
- Help your child use a ruler and a permanent marker to make a rectangle halfway up the soda bottle. The dimensions of the rectangle do not need to be exact, but should be roughly four inches high and three inches across, big enough for a bird to fit in.
- Have them draw a similarly sized rectangle on the opposite side of the bottle.
- Parents: carefully use a knife to poke a hole in both marked rectangles.
- Let your child use sharp scissors to cut out the rectangle.
- Help them use the hold punch to poke a hold an inch below each rectangle.
- Have them insert two chopsticks into the holes.
- Let them tie a long piece of string around the cap of the bottle.
- For the final step, have your child fill the bottle with birdseed and then find a spot to hang it!
- To take it one step further, purchase a simple bird guide book of the common local birds. Have your child start a special bird watching journal and see if they can begin to identify each bird.
Are there any special recycled crafts projects that you have made with your child? Please share them in the comments below!
Source: Education.com